

Recipe for Angst - Abiknits No Gauge Swatch Top

Abiknits No Gauge Swatch Top (ANGST)
Skill Level: Intermediate beginner
Materials:
Yarn: I used Jonelle Cotton Shine DK: 50% cotton/50% rayon blend. 169 meters/100grams in three colours. 2 balls of the MC (dark blue) and partial balls of 2 contrasting colors (grey and teal).
I think this top would look great in Knitpicks Shine, Elann's Sonata, Fixation, Rowan's wool cotton, A self striping type of yarn would be fantastic in this top...Just about anything that gives about 5 sts to the inch is great, though a finer gauge would be fantastic as well - I don't think this would look good in a bulky yarn. The main criteria that I had for this top was that it be next to skin soft. Somehow the neckline just doesn't really work with a shirt underneath.
Needles: I used what the ball band recommended: 4mm (US 6) circular needles. Straights are not recommended. One extra needle in a similar size for 3 needle bind off (dpn or straight is fine, I actually used a bamboo skewer on one side for that part!)
Crochet Hook: For neck edging option 1, a crochet hook of the corresponding mm size as your knitting needles.
Measuring tape
Lace pattern for edgings: Cane Leaf Lace edging printed from Knitting-and.com was the edging that was used on my version - you can substitute another edging if you like, or omit the lace edging altogether if you wish.
Now to get started!!
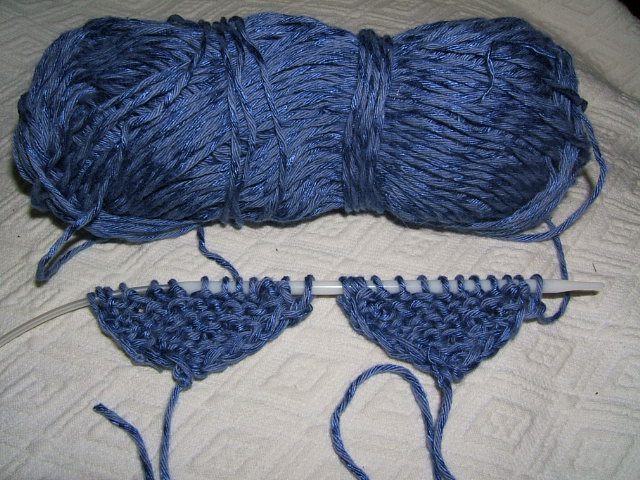
 Front placket: beginning triangles - make 2 at the same time by casting on 2 sets of 3 stitches. I did this by using the beginning and the end of the same ball of yarn, as pictured.
The following directions are repeated for each beginning triangle:
Row 1: knit 1. Inc 1 (knit into front and back of stitch). purl 1. (repeat on 2nd triangle, using other end of yarn)
Row 2: slip 1. Inc 1. knit 2. purl 1
 Continue to slip the first stitch; increase into the second stitch; knit across the row, purling the last stitch of the triangle. Your beginning triangles should look something like the picture to the right after a couple of rows.
Continue working your triangles as established until the side of the base is approximately 1/2 the measurement of the distance between the insides of your bra straps.
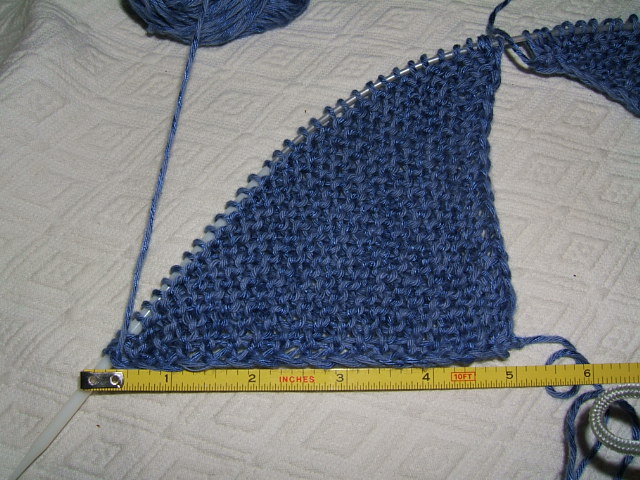 Measure along the edge of the knitting as shown to determine when the beginning triangles are the size that you need. Again, this is equal to 1/2 the distance between the insides of your bra straps.
Once your base triangles have been knit to the right size you are ready to join the two triangles together. Just knit across the first triangle (still slipping the first stitch and increasing into the second stitch) and continue knitting across the second triangle. Don't forget to purl the last stitch of the 2nd triangle.
 Cut the yarn for the second triangle leaving enough of a tail to weave in.
Your base triangles are now joined. Continue to slip the first stich of each row, and increase into the second stitch. Knit to the center where the second triangle is now joined and do a double decrease in the center. I used a slip 1, knit 2 together, PSSO to do my double decrease.
Continue to knit the center placket increasing in the 2nd stitch of every row and double decrease in the center of every other row.
 After the beginning triangles have been joined it is time to start the stripe pattern. This version has a stripe pattern commonly known as 3 row garter stitch
Row 1: MC
Row 2: Contrast color 1 (teal)
Row 3: Contrast color 2 (grey)
For this pattern there is a color change every single row - the next color to be worked waiting patiently for you where you left it on the row before.
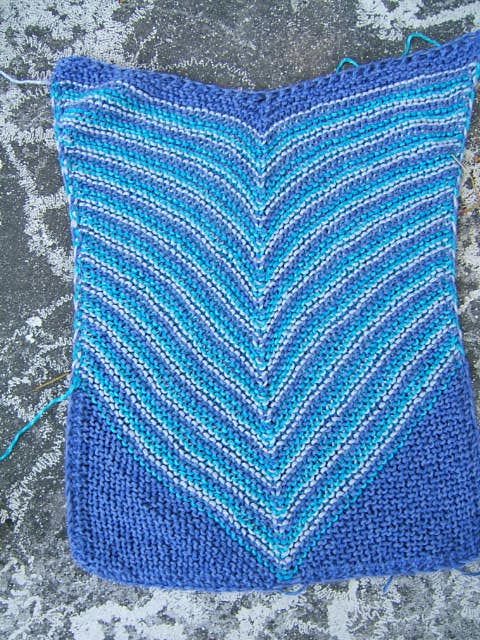 Continue working as established until the vertical outside edge of the front is the proper length for you. (Measured from original 3 cast on sts all the way up the side).
I usually just hold the work in progress up to myself to determine where that is. For those of you who like to have more concrete number my Angst is 14" along the front placket. It might be a bit more clever to take out the tape measure again and measure the distance from the top of your collar bone to where you like your sweaters to hit on your hips. If you are planning to do the lace edging you would want it to end about 2 inches from where you want it to hit on your hips.
When the front placket was 13 1/2" long I stopped working the stripe pattern, and finished off the last couple of rows in the dark blue (MC).
Bind off all stitches.
(optional) I used a YO bind off for the front placket: Knit 2 stitches, slip 1st stitch over 2nd stitch. *YO, knit 1. Pass yo over first stitch, pass the knit stitch over the first stitch,* Repeat between *'s until all stitches are bound off.
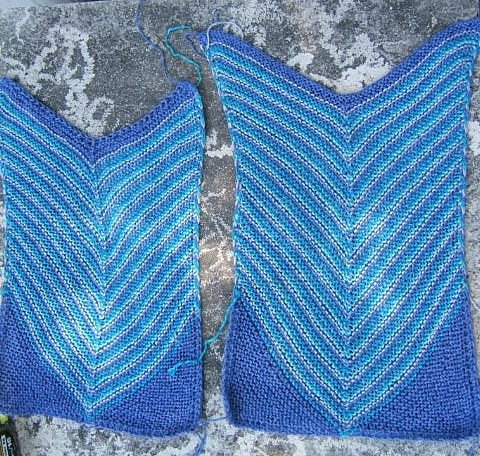 Back placket: Worked the same as for the front placket except 3-4 inches longer. As you can see from my photo, this gives quite a low back neckline. If you want a higher back neck, simply work the back placket a bit longer than that, and adjust the number of cast on stitches for the neckline accordingly.
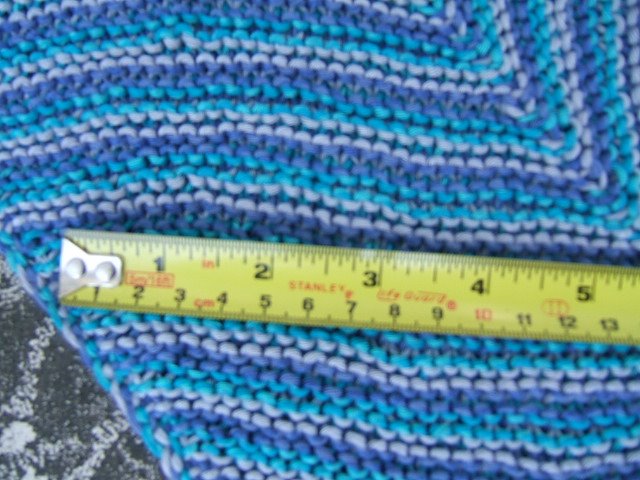
Now is a good time to figure out how many stitches to the inch we're actually getting. Measure on the diagonal to figure out how many stitches to the inch you're getting. My top had 18 stitches/4" which = 4.5 stitches/" scribble this number down somewhere, you'll need it after the next step.
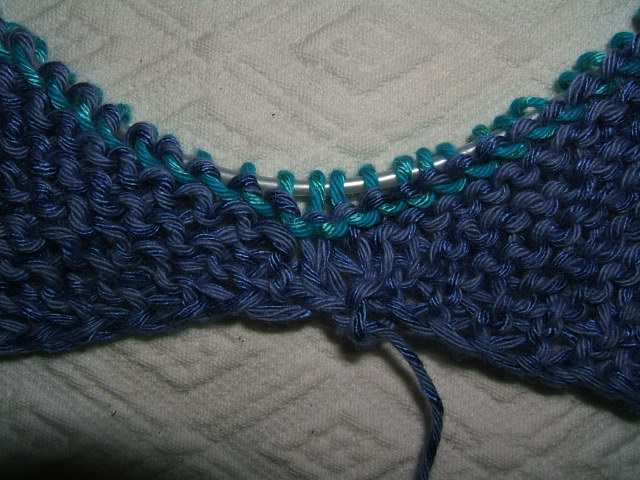
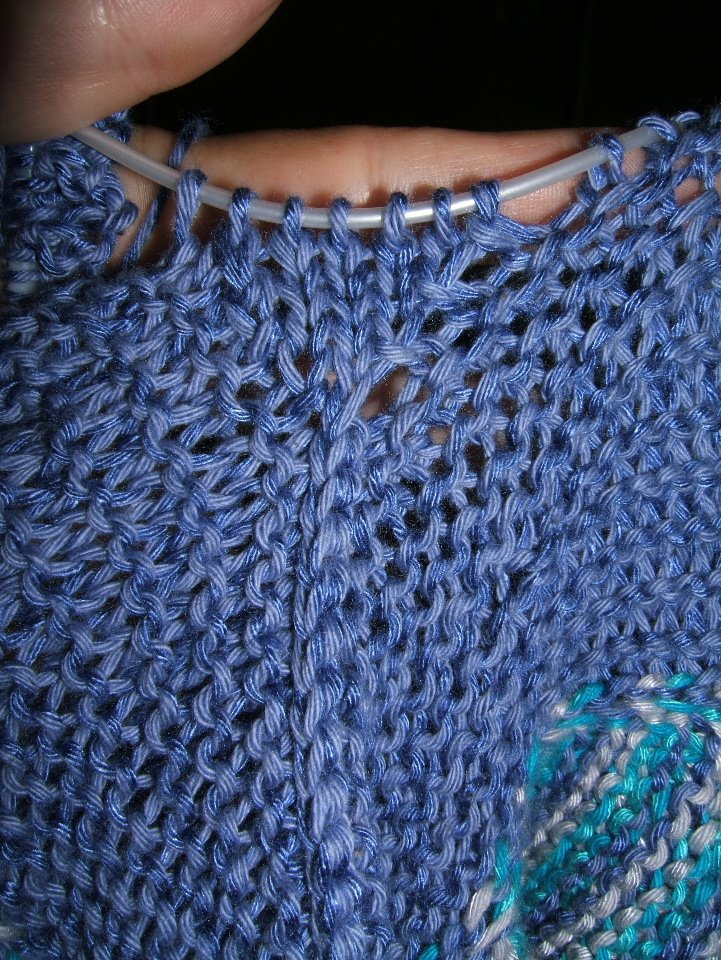
 Side Panel: Attach MC to the bottom edge of your base triangle on the front placket (where you originally cast on). Pick up and knit one stitch in every slipped stitch going up the side as shown. I like to pick up from one leg of the slipped stitches, it creates a nice little braided edge along the side, and just generally makes me happy.
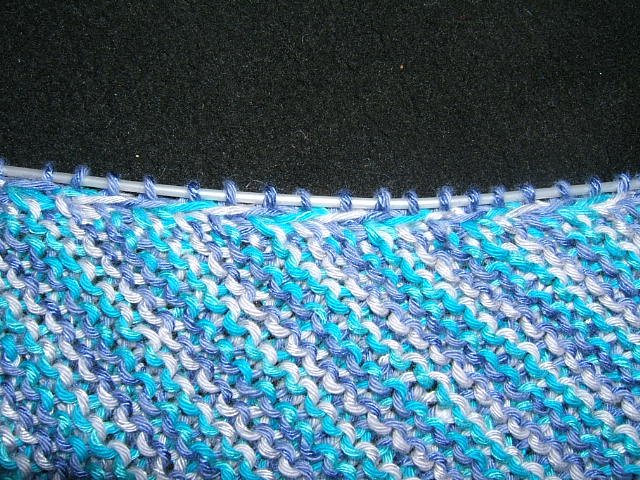
 The photo to the right shows the orientation of the top as it's being put together: We just started at the corner with the beginning triangle on the front placket picking up stitches along the long edge, Next we cast on stitches for the shoulder and side of the neck opening and then continue picking up stitches starting from the top going all the way down to the beginning triangle on the back placket.
Now we get to figure out how many stitches to cast on for the shoulder. I use a cable cast on for this step. I cast on about 8 inches worth of stitches, and then continued down the back placket picking up one stitch in every edge stitch. This creates a fairly low neck line, if you want a bit more coverage cast on less stitches (somewhere around 6" worth).
The front and back are now joined with stitches cast on in the middle for the neck. Make a note of how many stitches in total you have picked up in total on this side.
Knit back and forth in plain garter stitch still purling the last stitch and slipping the first stitch of every row. This creates a nice braided edge that will come in handy when it's time to do the sideways garter stitch edging around the bottom of your Angst. Knit until the panel is the appropriate size. My garter stitch strip was 2" long. The way I calculated how wide the side panels should be was to center the knitting on top of a top I wear a lot and like the fit of. Or you can take the measurements for your center front, add that to your center back, and then extrapolate how many more inches you are going to need and divide that number by 4... This top does look nice with an inch or two of negative ease, or even 0 ease.
If you feel like getting fancy you can throw some short rows into the top of the shoulder shaping - around where your bust is at it's widest point. I did two sets of short rows, the first starting at about 10" from the bottom edge, and the other starting at about 11". Before I started my 3 needle bind off I also did 2 sets of short rows along the bottom 3" of both sides of the bottom of the top. If you are especially curvaceous, you can do more short rowing to create more an hourglass shape.
 Side seams: Once your shoulder/side strip is the appropriate length it's time to connect things up a bit. A three needle bind off is perfect for this application.
After the last row has been completed, simply start your three needle bind off by putting both ends of your circular needles together, and using the third needle bind off the bottom 10 inches or so worth of stitches. Or however long you need to get from the bottom of the top to approximately 2 inches from the bottom of your armpit. Leave the last stitch bound off on your third needle. The remaining live stitches just stay put for the moment.
 Underarm Shaping: After I've done the three needle bind off for the appropriate length I do a cute little inverted triangular gusset for the underarm shaping. It goes something like this:
Row 1: knit the last live stitch from your three needle bind off. Knit the next stitch on the left needle. Turn work
Row 2: Slip first stitch, purl two stitches (the one that you knit for your 3 needle bind off and the next live stitch waiting to be bound off).
Row 3: Slip the first stitch, knit 3.
Continue to work back and forth in stockinette, slipping the first stitch and working an additional stitch on each row until your gusset is approximately an inch and a half long. End on a right side row. This creates a nice little gusset or ease for the under the arm part of the sleeve.
Sleeves: You can just bind off the remaining the stitches at this point for a sleeveless tank, or you can add the lace edging as I did to make short sleeves.
I used a sideways knitted on lace edging that I found on Knitting-and.com called the
Cane Leaf Lace edging printed from her Homework 1891 section. There's a huge selection of patterns there, that would be suitable for this particular top - you can feel free to substitute, or even just do the sideways edging as straight garter stitch.
Cast on 15 sts. Turn. Knit back. Knit last stitch of the 15 together with the next live stitch on the needle. Turn work, slipping the first stitch as you are knitting back towards the edge. Follow the chart printed out for the lace edging. Continue the sideways lace edging around until you have used up all of the live stitches. Bind off.
2nd Side Panel: Start picking up stitches from the bottom of the back placket on the second side. Repeat directions for first side panel and sleeves. Be very careful at the point where you have cast on your neck/shoulder stitches and are ready to start picking up stitches along the front placket. You really don't want any twists here!
Also, make sure you have the same number of stitches as you did for the first side panel! (I know it seems obvious, but I've actually done one of these tops where I was quite a ways into the 2nd side panel, and discovered that my stitch count was way off from the first side panel. Symmetry is good! Ripping is bad!)
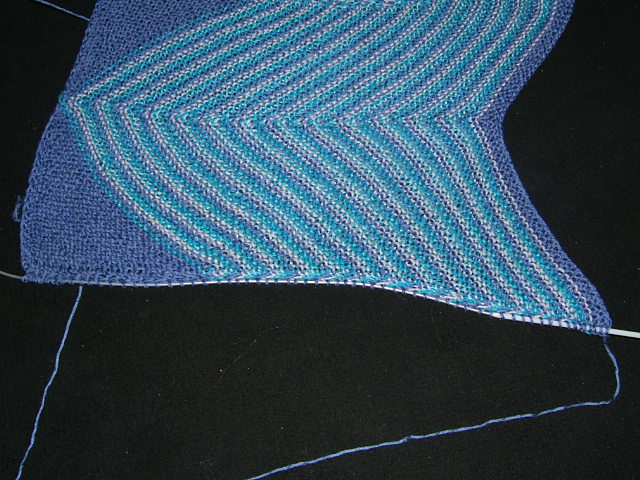
 Here's what my top looked like at the point where I started the three needle bind off for the second side seam.
After I have completed both of the side panels and seams I try the top on.
 As you can see it still needs a bit of work. The neck definitely needs to be pulled in a fair amount, and the lace edging that I used to create sleeves would work nicely attached to the bottom of the piece to lengthen the top and add continuity to the overall design.
Neck Finishing Option 1: 1 single crochet (double crochet in UK terms) in every loop around the neck edging, decreasing in the center front, center back, and the joins between the front plackets and side panel (6 decrease points around the neck edging). I did 2 rounds of single crochet this way for this version. One nice thing about the crochet option is that you can try it on as you go and see exactly what the finished effect will be. Another nice thing is that it's easy to go back and add another round if you find that the neck is bigger than you would like.
Neck Finishing Option 2: Join yarn at the junction where the back center placket and the side panel meet and pick up one stitch for every cast on or bound off stitch all the way around. Knit a couple of rounds doing a double decrease at the junctions where the center plackets meet the side panels and the centers of the front and back plackets (6 decrease points around the neck in total) every other round.
Bottom lace edging: (optional) Same principle as the lace edging for the sleeves. Instead of eating up live stitches every other row, you are catching one edge stitch from the bottom edge of Angst every other row. I cast on 15 stitches turn and knit 15 stitches back, slipping the bottom edge stitch (right on the 3 needle bind-off seam) onto my right needle, then pass the last stitch of the lace edging over that stitch. Turn and knit back in pattern. The Cane Leaf pattern specifies to slip that first stitch, but if you have substituted another pattern or have decided to do a plain sideways garter stitch edging that does not specify to do this - you should.
Knit sideways knit lace edging all the way around the bottom of the sweater. Bind off the sideways lace stitch edging stitches.
Finishing: Sew the stitches that you cast on for the lace edging to the bound off stitches of the sideways garter stitch edgings together under the sleeves and at the side seam on the bottom of the sweater. Weave in ends.
Wear with pride!

10 comments:
Congratulations Abi! You did it and it sounds pretty good to me. ;o)
Wow lady...talk about putting in some hours! It looks fantastic and is something I have to add near the top of my Knit Something Very Cool For Me list :) Thanks for all your hard work and a fabulous design!
That is an awesome pattern! Thanks for posting it. Love the way you wrote it out, too--very easy to follow. Once word gets out on this one, I see a KAL goin' on.
Leah
Thank you so much, maybe this will be my summerholiday project! I'm from The Netherlands; did you know what the word ANGST means in Dutch? Fear! But with you welwritten pattern, I don't feel any! ;)
Hello Abigail. I see you're still creating beautiful things. This is Carol Ann from Knit & Chat. Please come over to the forum and say hello. http://forums.delphiforums.com/knitchat/start
Ah, the perfect sweater to use the Sonata from the failed Crystal Cove. I even have 3 colors. (G) Thanks so much for posting the recipe. I need to start thinking like this on sweaters - I've been doing it on socks for years.
sandeleh@sbcglobal
I found this on Ravelry! This pattern is totally awesome!
My english is not so good. I will say Thankyou!!!
I found it by? on? ravelry.
strickwolke from germany
Thank you! I am absolutely delighted with your recipe for a perfect tank top!
Great readingg your blog
Post a Comment